Topics -> graphql, django, ajax, webdevelopment, api
Preview Link -> PokedexWithGraphene
Source Code Link -> GitHub
What We are going to do?
- Starting the Django Project
- Creating a pokemon app within the PokedexWithGraphene Project
- Create a Album and Song model in pokemon/models.py
- Importing pokemon data from json file using Django Extensions
- Writing GraphQL queries and schema
- Creating a view for handling the request made from the client
- Adding function handlers to routes
- Creating a Template for displaying the song data on the page
- Fetching data using ajax into templates
Understanding Some Important Concepts
What is Django Framework?
Django is a Python-based free and open-source web framework that follows the model–template–views architectural pattern.
Top Features of Django Framework
- Excellent Documentation
- SEO Optimized
- High Scalability
- Versatile in Nature
- Offers High Security
- Provides Rapid Development
Step 1 => Starting the Django Project
Initialize a Django project by following command. Python must be installed on your system.
pip install Django
You can confirm the installation by checking the django version by following command
python -m django --version
Starting the Project
django-admin startproject PokedexWithGraphene
You get the project structure like this
PokedexWithGraphene/
    manage.py
    PokedexWithGraphene/
        __init__.py
        settings.py
        urls.py
        asgi.py
        wsgi.py
Step 2 -> Creating a pokemon app within the PokedexWithGraphene Project
What is a Django App?
An app is a Web application that does something – e.g., a Weblog system, a database of public records or a small poll app.
A project is a collection of configuration and apps for a particular website. A project can contain multiple apps. An app can be in multiple projects.
Creating the pokemon app
python manage.py startapp pokemon
That’ll create a directory pokemon, which is laid out like this:
pokemon/
    __init__.py
    admin.py
    apps.py
    migrations/
        __init__.py
    models.py
    tests.py
    views.py
Including your app and libraries in project
INSTALLED_APPS = [
    'django.contrib.admin',
    'django.contrib.auth',
    'django.contrib.contenttypes',
    'django.contrib.sessions',
    'django.contrib.messages',
    'django.contrib.staticfiles',

    # for loading data
    'django_extensions',

    # our main reusable components
    'pokemon.apps.PokemonConfig',

    # graphql library
    'graphene_django'
]
Making migrations
Once the model is defined, the django will automatically take schemas and table according to the fields supplied in the django model.
python manage.py makemigrations
python manage.py migrate
Step 3 -> Create a Pokemon and PokemonTag model in pokemon/models.py
What is a Django Model?
A model is the single, definitive source of truth about your data. It contains the essential fields and behaviors of the data you’re storing. Django follows the DRY Principle.
The goal is to define your data model in one place and automatically derive things from it.
Let's create a Django Model.
A database contains a number of variable which are represented by fields in django model.Each field is represented by an instance of a Field class – e.g., CharField for character fields and DateTimeField for datetimes. This tells Django what type of data each field holds.
from django.db import models


class PokemonTag(models.Model):
    tag = models.CharField(max_length=20)

    def __str__(self):
        return self.tag


class Pokemon(models.Model):
    pokemon_name = models.CharField(max_length=30)
    pokemon_url = models.CharField(max_length=30)
    pokemon_id = models.CharField(max_length=30, primary_key=True)
    pokemon_image_url = models.CharField(max_length=30)
    pokemon_tag = models.ManyToManyField(PokemonTag, related_name='pokemon')

    def __str__(self):
        return f"{self.pokemon_id}  {self.pokemon_name}"
Here, We have used the many to many relationship between the Pokemon and PokemonTag as there can be many tags for pokemon and vice versa.
Adding models to admin panel
Django provides built-in admin panel to manage the data into model
from django.contrib import admin

# Register your models here.
from pokemon.models import Pokemon, PokemonTag

admin.site.register(Pokemon)
admin.site.register(PokemonTag)
Step 4 -> Importing pokemon data from json file using Django Extensions(pokemon/script/load_pokemons.py)
Django EXtension
It will help us to load data seamlessly without much manual work. It uses the JSON library to do the task.
import json
from pathlib import Path

from PokedexWithGraphene import settings
from pokemon.models import Pokemon, PokemonTag


def run(*args):
    file_path = Path(settings.BASE_DIR, 'pokemon/static/pokemon/pokemon.json')
    with open(file_path, encoding="utf8") as file:
        pokemon_data = json.loads(file.read())

    for pokemon in pokemon_data:
        pokemon_obj = Pokemon.objects.create(
            pokemon_url=pokemon["pokemon_url"],
            pokemon_name=pokemon["pokemon_name"],
            pokemon_id=pokemon["pokemon_id"],
            pokemon_image_url=pokemon["pokemon_image_url"]
        )
        pokemon_obj.pokemon_tag.add(*list(PokemonTag.objects.get_or_create(tag=pokemon)[0].id for pokemon in pokemon['pokemon_tags']))
        print(pokemon_obj.pokemon_id)
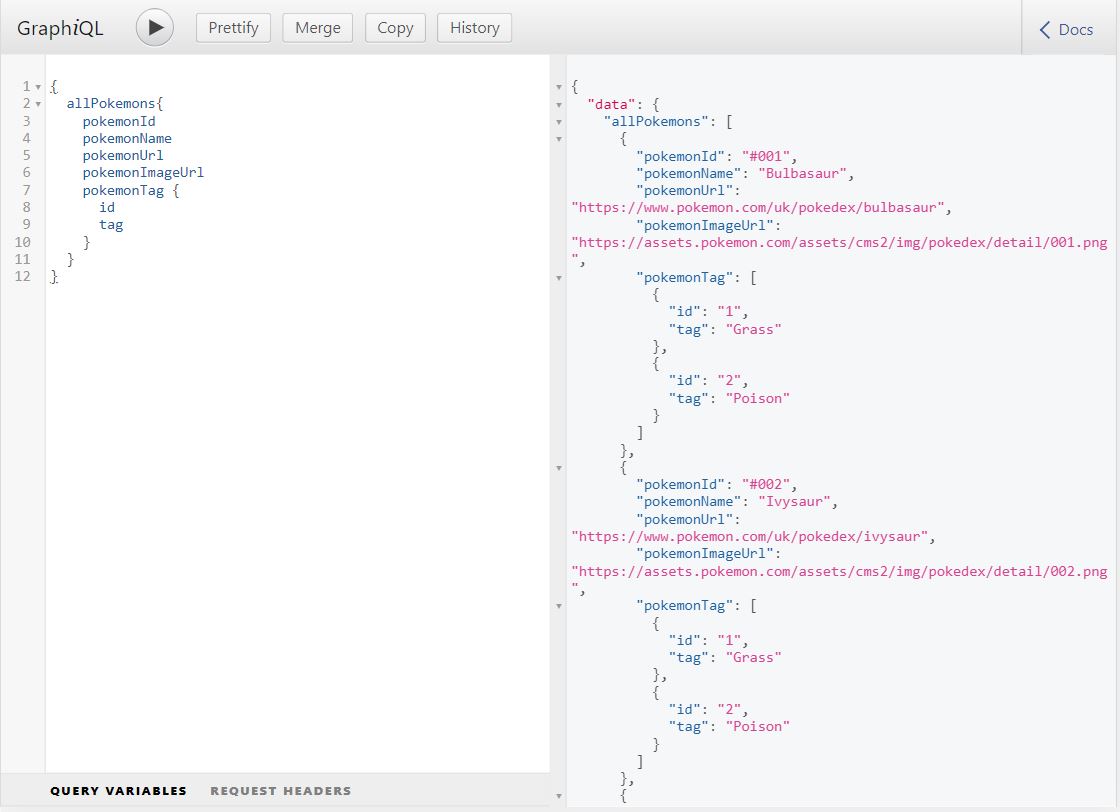
Step 5 -> Writing GraphQL queries and schema.
import graphene
from graphene_django.types import DjangoObjectType

from .models import Pokemon, PokemonTag


class PokemonType(DjangoObjectType):
    class Meta:
        model = Pokemon
        field = '__all__'


class PokemonTagType(DjangoObjectType):
    class Meta:
        model = PokemonTag


class Query(graphene.ObjectType):
    all_pokemons = graphene.List(PokemonType)
    pokemon_by_id = graphene.Field(PokemonType,id=graphene.String(required=True))

    def resolve_all_pokemons(self, info, **kwargs):
        return Pokemon.objects.all()

    def resolve_pokemon_by_id(self,info,id):
        try:
            return Pokemon.objects.get(pokemon_id=id)
        except Pokemon.DoesNotExist:
            return 404


schema = graphene.Schema(query=Query)
We are using the GraghQl playground to get the right query to get the data.
Step 6 -> Creating a view for handling the request made from the client.
What is a Django View?
A view function, or view for short, is a Python function that takes a Web request and returns a Web response.
from django.shortcuts import render


# Create your views here.
def pokemon_home(request):
    return render(request, 'pokemon/pokemon_list.html')
We are using Django render in-built function.
The render() function takes the request object as its first argument, a template name as its second argument and a dictionary as its optional third argument. It returns an HttpResponse object of the given template rendered with the given context.
Step 7 -> Adding function handlers to routes.(PokedexWithGraphene/urls.py)
Whenever user visit the user, a function is called in view which takes care of response.
"""PokedexWithGraphene URL Configuration"""
from django.conf.urls.static import static
from django.contrib import admin
from django.urls import path, include
from django.views.decorators.csrf import csrf_exempt
from graphene_django.views import GraphQLView

from PokedexWithGraphene import settings
from pokemon.schema import schema

urlpatterns = [
    path('admin/', admin.site.urls),
    path('graphql/', csrf_exempt(GraphQLView.as_view(
        graphiql=True, schema=schema
    ))),
    path('pokemons/', include('pokemon.urls'))
]
if settings.DEBUG:
    urlpatterns += static(settings.STATIC_URL,
                          document_root=settings.STATIC_ROOT)
    urlpatterns += static(settings.MEDIA_URL,
                          document_root=settings.MEDIA_ROOT)
Adding sub path for pokemon app
It defines the particular path for pokemon app
from django.urls import path

from pokemon import views

app = 'pokemom'

urlpatterns = [
    path('',views.pokemon_home),
                            ]
Step 8 -> Creating a Template for displaying the song data on the page
We are using the jinja templating engine for displaying the data.
<!DOCTYPE html>
<html lang="en">
<head>
    <meta charset="UTF-8">
    <title>Pokemon List</title>
    {% load static %}
    <link rel="stylesheet" href="{% static 'pokemon/style.css' %}">
</head>
<body>
    <h1> class="head">Pokemon List</h1>
    <div> class="pokemon-container card-group">
    </div>
    <script> src="https://code.jquery.com/jquery-3.5.1.min.js" integrity="sha256-9/aliU8dGd2tb6OSsuzixeV4y/faTqgFtohetphbbj0=" crossorigin="anonymous"></script>
    <script> src="{% static 'pokemon/pokemon-list.js' %}"></script>
</body>
</html>
<script> src="{% static 'pokemon/pokemon-list.js' %}"></script> : - This script will fetch the data explained in next step
Step 9 -> Fetching data using ajax into templates
Fetching data using the ajax call to the pokemon route 127.0.0.1:8000/pokemons/
pokemons/static/pokemon/pokemon-list.js
$(function () {

    'use strict';
    $.ajax({
        type: 'POST',
        url: '../graphql/',
        contentType: "application/json",
        data: JSON.stringify({
            query: "{  allPokemons{    pokemonId    pokemonUrl    pokemonName    pokemonImageUrl  pokemonTag{ tag }}}"
        }),
        success: function (data) {
            for (let i = 0; i < data['data']['allPokemons'].length; i++) {
                const pokemon = data['data']['allPokemons'][i];
                $(".pokemon-container").append(`
                    <div class="pokemon-card">
                        <img src="${pokemon['pokemonImageUrl']}" class="card-img-top" alt="pokemon image">
                        <div class="pokemon-body">
                            <h5 class="pokemon-title">${pokemon['pokemonName']}</h5>
                            <h3 class="pokemon-id">${pokemon['pokemonId']}</h3>
                            <h4 class="pokemon-tags">${pokemon['pokemonTag'][0]['tag']}</h4>
                        <div class="pokemon-link">
                            <a href="${pokemon['pokemonUrl']}" class="pokemon-button">More Details</a>
                        <div>
                        </div>
                        </div>`
                );
            }
        },
        error: function (error_data) {
            console.log(error_data['responseText'])
        }
    })
});
Add Some styles to make it attractive
Deployment
You can easily deploy on Heroku
You can read more about on Analytics Vidhya Blog
Web Preview / Output
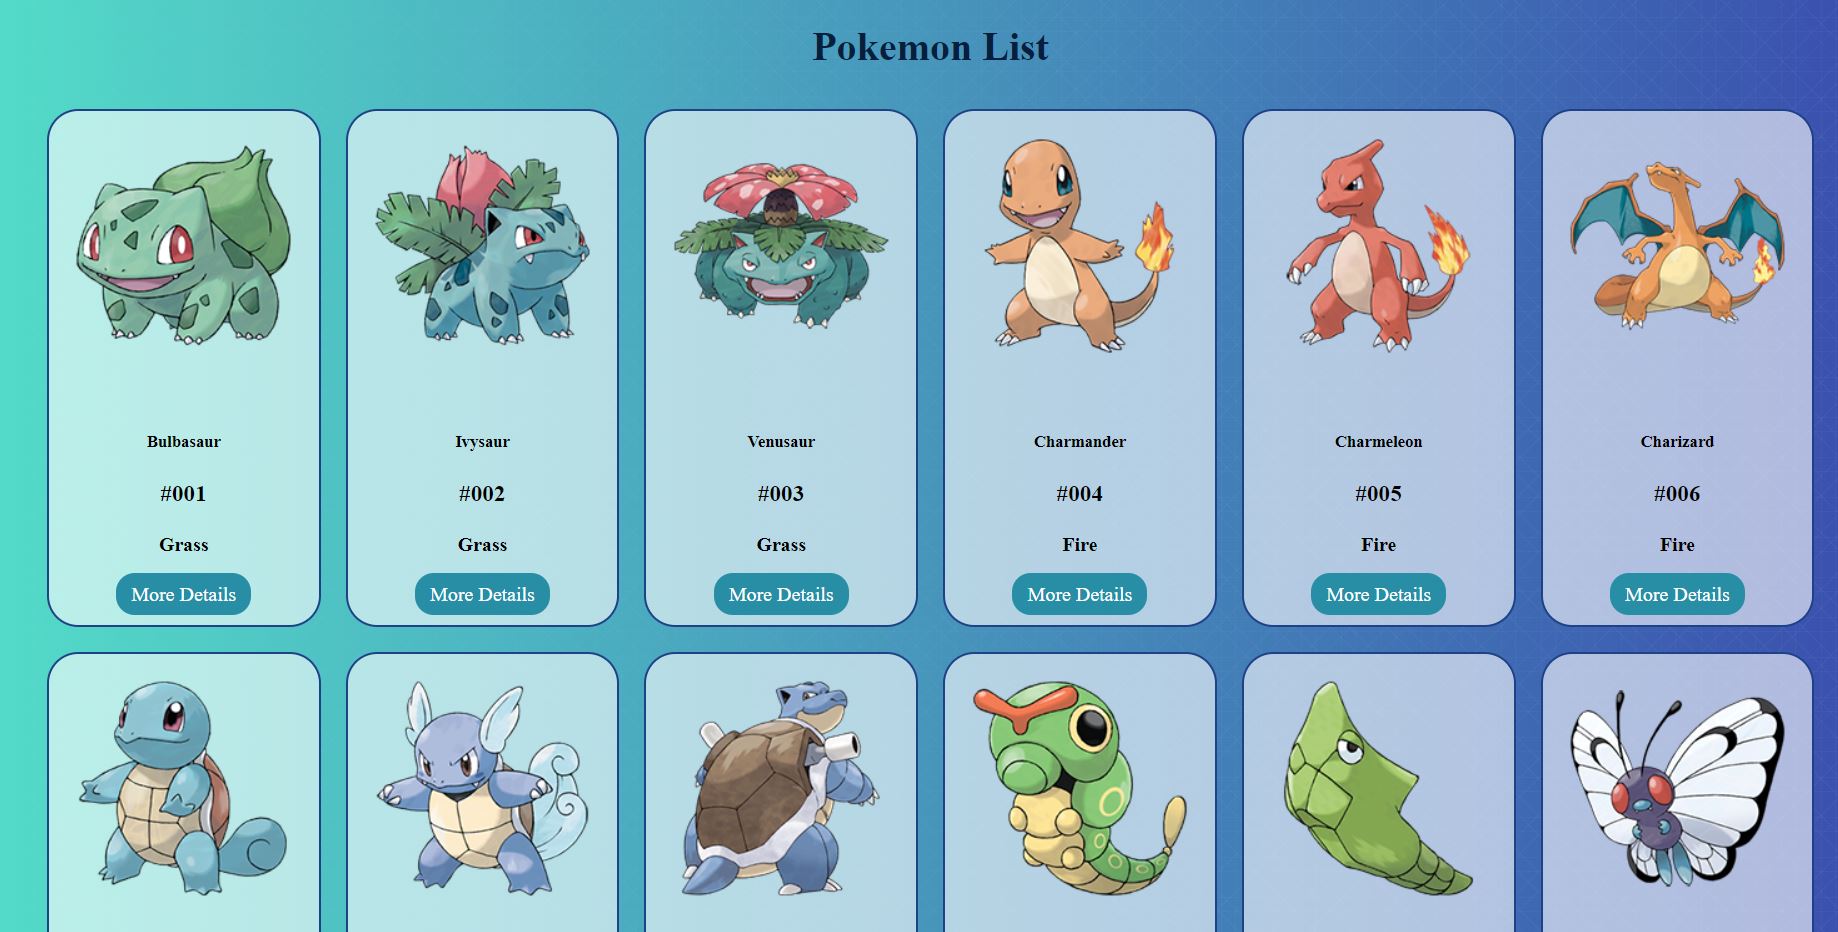 Web preview on deployment
Placeholder text by Praveen Chaudhary · Images by Binary Beast